Ember has a rich ecosystem of addons that can be easily added to projects. Addons provide a wide range of functionality to projects, often saving time and letting you focus on your project.
To browse addons, visit the Ember Observer website. It catalogs and categorizes ember addons that have been published to NPM and assigns them a score based on a variety of criteria.
For Super Rentals, we'll take advantage of two addons: ember-cli-tutorial-style and ember-cli-mirage.
ember-cli-tutorial-style
Instead of having you copy/paste in CSS to style Super Rentals, we've created an addon called ember-cli-tutorial-style that instantly adds CSS to the tutorial.
The addon works by generating a file called ember-tutorial.css and putting that file in the super-rentals vendor directory.
The vendor directory in Ember is a special directory where you can include content that gets compiled into your application.
When Ember CLI builds our app from our source code, it copies ember-tutorial.css into a file called vendor.css.
As Ember CLI runs, it takes the ember-tutorial CSS file and puts it in a file called vendor.css.
The vendor.css file is referenced in app/index.html, making the styles available at runtime.
We can make additional style tweaks to vendor/ember-tutorial.css, and the changes will take effect whenever we restart the app.
Run the following command to install the addon:
ember install ember-cli-tutorial-styleSince Ember addons are npm packages, ember install installs them in the node_modules directory, and makes an entry
in package.json. Be sure to restart your server after the addon has installed successfully. Restarting the server will
incorporate the new CSS and refreshing the browser window will give you this:
ember-cli-mirage
Mirage is a client HTTP stubbing library often used for Ember acceptance testing. For the case of this tutorial, we'll use mirage as our source of data rather than a traditional backend server. Mirage will allow us to create fake data to work with while developing our app and mimic an API. The data and endpoints we setup here will come into play later in the tutorial, when we use Ember Data to make server requests.
Install the Mirage addon as follows:
ember install ember-cli-mirageOur primary focus with mirage will be in the config.js file, which is where we can define our API endpoints and our data.
We will be following the JSON-API specification which requires our data to be formatted a certain way.
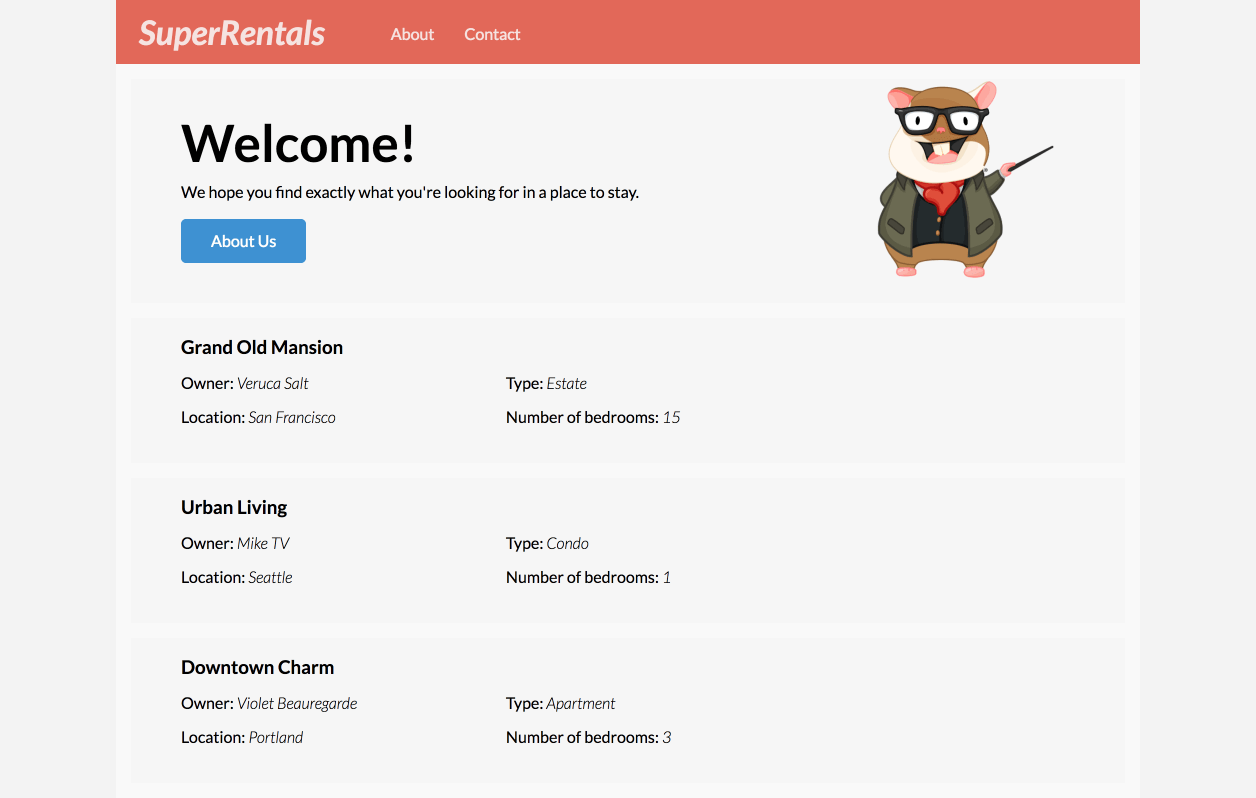
Let's configure Mirage to send back our rentals that we had defined above by updating mirage/config.js:
export default function() {
  this.namespace = '/api';

  this.get('/rentals', function() {
    return {
      data: [{
        type: 'rentals',
        id: 'grand-old-mansion',
        attributes: {
          title: 'Grand Old Mansion',
          owner: 'Veruca Salt',
          city: 'San Francisco',
          "property-type": 'Estate',
          bedrooms: 15,
          image: 'https://upload.wikimedia.org/wikipedia/commons/c/cb/Crane_estate_(5).jpg'
        }
      }, {
        type: 'rentals',
        id: 'urban-living',
        attributes: {
          title: 'Urban Living',
          owner: 'Mike Teavee',
          city: 'Seattle',
          "property-type": 'Condo',
          bedrooms: 1,
          image: 'https://upload.wikimedia.org/wikipedia/commons/2/20/Seattle_-_Barnes_and_Bell_Buildings.jpg'
        }
      }, {
        type: 'rentals',
        id: 'downtown-charm',
        attributes: {
          title: 'Downtown Charm',
          owner: 'Violet Beauregarde',
          city: 'Portland',
          "property-type": 'Apartment',
          bedrooms: 3,
          image: 'https://upload.wikimedia.org/wikipedia/commons/f/f7/Wheeldon_Apartment_Building_-_Portland_Oregon.jpg'
        }
      }]
    };
  });
}
export default function() {
 // These comments are here to help you get started. Feel free to delete them.

  /*
    Config (with defaults).

    Note: these only affect routes defined *after* them!
  */

  // this.urlPrefix = '';    // make this `http://localhost:8080`, for example, if your API is on a different server
  // this.namespace = '';    // make this `/api`, for example, if your API is namespaced
  // this.timing = 400;      // delay for each request, automatically set to 0 during testing

  /*
    Shorthand cheatsheet:

    this.get('/posts');
    this.post('/posts');
    this.get('/posts/:id');
    this.put('/posts/:id'); // or this.patch
    this.del('/posts/:id');

    http://www.ember-cli-mirage.com/docs/v0.3.x/shorthands/
  */
}
Mirage works by overriding the JavaScript code that makes network requests and instead returns the JSON you specify.
We should note that this means you will not see any network requests in your development tools but will instead see the JSON logged in your console.
Our update to mirage/config.js configures Mirage so that whenever Ember Data makes a GET request to /api/rentals, Mirage will return this JavaScript object as JSON and no network request is actually made.
We also specified a namespace of /api in our mirage configuration.
Without this change, navigation to /rentals in our application would conflict with Mirage.
In order for this to work, we need our application to default to making requests to the namespace of /api.
To do this, we want to generate an application adapter.
An Adapter is an object that Ember Data uses to determines how we communicate with our backend.
We will cover Ember Data in more detail later in this tutorial.
For now, let's generate an adapter for our application:
ember generate adapter applicationThis adapter will extend the JSONAPIAdapter base class from Ember Data:
import DS from 'ember-data';

export default DS.JSONAPIAdapter.extend({
  namespace: 'api'
});
If you were running ember serve in another shell, restart the server to include Mirage in your build.
Note that at this point of the tutorial, the data is still provided by the app/routes/rentals.js file. We will make use of the mirage data we set up here in the upcoming section called Using Ember Data.