This section of the Guides describes the essential features of Ember Data, a powerful set of tools for formatting requests, normalizing responses, and efficiently managing a local cache of data.
Ember.js itself works with any type of back end: REST, JSON:API, GraphQL, or anything else. To learn about other ways to handle data and to find extensions, check out the guide for making API requests, look for plugins on Ember Observer, and search for community-made tutorials.
What are Ember Data models?
In Ember Data, models are objects that represent the underlying data
that your application presents to the user.
Note that Ember Data models are a different concept than the
model method on Routes,
although they share the same name.
Different apps may have very
different models, depending on what problems they're trying to solve.
For example, a photo sharing application might have a Photo
model to represent a particular photo, and a PhotoAlbum that
represents a group of photos. In contrast, an online shopping app would
probably have different models, like ShoppingCart, Invoice, or
LineItem.
Models tend to be persistent. That means the user does not expect model data to be lost when they close their browser window. To make sure no data is lost, if the user makes changes to a model, you need to store the model data somewhere that it will not be lost.
Typically, most models are loaded from and saved to a server that uses a database to store data. Usually you will send JSON representations of models back and forth to an HTTP server that you have written. However, Ember makes it easy to use other durable storage, such as saving to the user's hard disk with IndexedDB, or hosted storage solutions that let you avoid writing and hosting your own servers.
Once you've loaded your models from storage, components know how to translate model data into a UI that your user can interact with. For more information about how components get model data, see the Specifying a Route's Model guide.
At first, using Ember Data may feel different than the way you're used to writing JavaScript applications. Many developers are familiar with using Ajax to fetch raw JSON data from an endpoint, which may appear easy at first. Over time, however, complexity leaks out into your application code, making it hard to maintain.
With Ember Data, managing models as your application grows becomes both simpler and easier.
Once you have an understanding of Ember Data, you will have a much better way to manage the complexity of data loading in your application. This will allow your code to evolve and grow, with better maintainability.
Ember Data flexibility
Thanks to its use of the adapter pattern, Ember Data can be configured to work with many different kinds of backends. There is an entire ecosystem of adapters and several built-in adapters that allow your Ember app to talk to different types of servers.
By default, Ember Data is designed to work out of the box with JSON:API. JSON:API is a formal specification for building conventional, robust, and performant APIs that allow clients and servers to communicate model data.
JSON:API standardizes how JavaScript applications talk to servers, so you decrease the coupling between your frontend and backend, and have more freedom to change pieces of your stack.
If you need to integrate your Ember.js app with a server that does not have an adapter available (for example, you hand-rolled an API server that does not adhere to any JSON specification), Ember Data is designed to be configurable to work with whatever data your server returns.
Ember Data is also designed to work with streaming servers, like those powered by WebSockets. You can open a socket to your server and push changes into Ember Data whenever they occur, giving your app a real-time user interface that is always up-to-date.
The Store and a Single Source of Truth
One common way of building web applications is to tightly couple user interface elements to data fetching. For example, imagine you are writing the admin section of a blogging app, which has a feature that lists the drafts for the currently logged in user.
You might be tempted to make the component responsible for fetching that data and storing it:
import Component from "@glimmer/component";
import { tracked } from "@glimmer/tracking";
import fetch from "fetch";

export default class ListOfDraftsComponent extends Component {
  @tracked drafts;

  constructor() {
    super(...arguments);

    fetch("/drafts").then((data) => {
      this.drafts = data;
    });
  }
}
You could then show the list of drafts in your component's template like this:
<ul>
  {{#each this.drafts key="id" as |draft|}}
    <li>{{draft.title}}</li>
  {{/each}}
</ul>
This works great for the list-of-drafts component. However, your app
is likely made up of many different components. On another page you
may want a component to display the number of drafts. You may be
tempted to copy and paste your existing willRender code into the new
component.
import Component from "@glimmer/component";
import { tracked } from "@glimmer/tracking";
import fetch from "fetch";

export default class DraftsButtonComponent extends Component {
  @tracked drafts;

  constructor() {
    super(...arguments);

    fetch("/drafts").then((data) => {
      this.drafts = data;
    });
  }
}<LinkTo @route="drafts">
Drafts ({{this.drafts.length}})
</LinkTo>Unfortunately, the app will now make two separate requests for the same information. Not only is the redundant data fetching costly in terms of wasted bandwidth and affecting the perceived speed of your app, it's easy for the two values to get out-of-sync. You yourself have probably used a web application where the list of items gets out of sync with the counter in a toolbar, leading to a frustrating and inconsistent experience.
There is also a tight coupling between your application's UI and the network code. If the URL or the format of the JSON payload changes, it is likely to break all of your UI components in ways that are hard to track down.
The SOLID principles of good design tell us that objects should have a single responsibility. The responsibility of a component should be presenting model data to the user, not fetching the model.
Good Ember apps take a different approach. Ember Data gives you a single store that is the central repository of models in your application. Routes and their corresponding controllers can ask the store for models, and the store is responsible for knowing how to fetch them.
It also means that the store can detect that two different components are asking for the same model, allowing your app to only fetch the data from the server once. You can think of the store as a read-through cache for your app's models. Both routes and their corresponding controllers have access to this shared store; when they need to display or modify a model, they first ask the store for it.
Injecting the store
Ember Data provides a store service that you can inject into routes, components, services and other classes, that enables you to access the store directly.
To do this, import the service decorator and inject a store property into your class. Let's see an example using a route:
import Route from "@ember/routing/route";
import { service } from "@ember/service";

export default class BlogPostsIndexRoute extends Route {
  @service store;

  model() {
    return this.store.findAll("posts");
  }
}
Models
In Ember Data, each model is represented by a subclass of Model that
defines the attributes, relationships, and behavior of the data that you
present to the user.
Models define the type of data that will be provided by your server. For
example, a Person model might have a name attribute that is a
string, and a birthday attribute that is a date:
import Model, { attr } from "@ember-data/model";

export default class PersonModel extends Model {
  @attr("string") name;
  @attr("date") birthday;
}
A model also describes its relationships with other objects. For
example, an order may have many line-items, and a
line-item may belong to a particular order.
import Model, { hasMany } from "@ember-data/model";

export default class OrderModel extends Model {
  @hasMany("line-item") lineItems;
}import Model, { belongsTo } from "@ember-data/model";
export default class LineItemModel extends Model {
@belongsTo("order") order;
}Models don't have any data themselves, they define the attributes, relationships and behavior of specific instances, which are called records.
Records
A record is an instance of a model that contains data loaded from a server. Your application can also create new records and save them back to the server.
A record is uniquely identified by its model type and ID.
For example, if you were writing a contact management app, you might
have a Person model. An individual record in your app might
have a type of person and an ID of 1 or steve-buscemi.
this.store.findRecord("person", 1); // => { id: 1, name: 'steve-buscemi' }An ID is usually assigned to a record by the server when you save it for the first time, but you can also generate IDs client-side.
Adapter
An adapter is an object that translates requests from Ember (such as "find the user with an ID of 1") into requests to a server.
For example, if your application asks for a Person with an ID of
1, how should Ember load it? Over HTTP or a WebSocket? If
it's HTTP, is the URL /person/1 or /resources/people/1?
The adapter is responsible for answering all of these questions. Whenever your app asks the store for a record that it doesn't have cached, it will ask the adapter for it. If you change a record and save it, the store will hand the record to the adapter to send the appropriate data to your server and confirm that the save was successful.
Adapters let you completely change how your API is implemented without impacting your Ember application code.
Caching
The store will automatically cache records for you. If a record had already been loaded, asking for it a second time will always return the same object instance. This minimizes the number of round-trips to the server, and allows your application to render its UI to the user as fast as possible.
For example, the first time your application asks the store for a
person record with an ID of 1, it will fetch that information from
your server.
However, the next time your app asks for a person with ID 1, the
store will notice that it had already retrieved and cached that
information from the server. Instead of sending another request for the
same information, it will give your application the same record it had
provided it the first time. This feature—always returning the same
record object, no matter how many times you look it up—is sometimes
called an identity map.
Using an identity map is important because it ensures that changes you make in one part of your UI are propagated to other parts of the UI. It also means that you don't have to manually keep records in sync—you can ask for a record by ID and not have to worry about whether other parts of your application have already asked for and loaded it.
One downside to returning a cached record is you may find the state of the data has changed since it was first loaded into the store's identity map. In order to prevent this stale data from being a problem for long, Ember Data will automatically make a request in the background each time a cached record is returned from the store. When the new data comes in, the record is updated, and if there have been changes to the record since the initial render, the template is re-rendered with the new information.
Architecture Overview
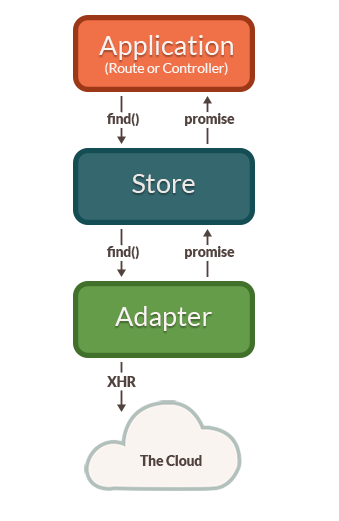
The first time your application asks the store for a record, the store sees that it doesn't have a local copy and requests it from your adapter. Your adapter will go and retrieve the record from your persistence layer; typically, this will be a JSON representation of the record served from an HTTP server.

As illustrated in the diagram above, the adapter cannot always return the requested record immediately. In this case, the adapter must make an asynchronous request to the server, and only when that request finishes loading can the record be created with its backing data.
Because of this asynchronicity, the store immediately returns a
promise from the findRecord() method. Similarly, any request that the
store makes to the adapter also returns promises.
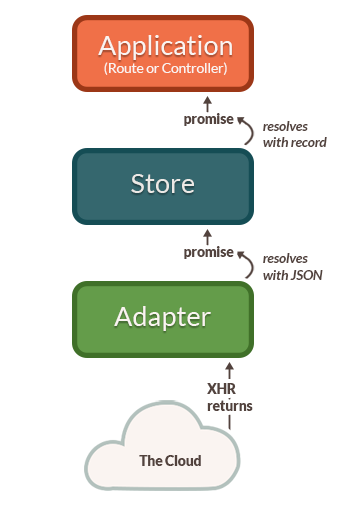
Once the request to the server returns with a JSON payload for the requested record, the adapter resolves the promise it returned to the store with the JSON.
The store then takes that JSON, initializes the record with the JSON data, and resolves the promise returned to your application with the newly-loaded record.

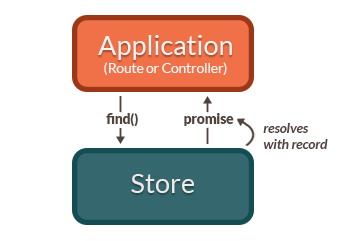
Let's look at what happens if you request a record that the store already has in its cache.

In this case, because the store already knew about the record, it returns a promise that it resolves with the record immediately. It does not need to ask the adapter (and, therefore, the server) for a copy since it already has it saved locally.
Models, records, adapters and the store are the core concepts you should understand to get the most out of Ember Data. The following sections go into more depth about each of these concepts, and how to use them together.